This was one of the cards that we did at our July Big Shot Club workshop. We used the new Argyle textured impressions embossing folder and the Perfect Pennants Bigz L die for the Sizzix Big Shot. It's hard to see from the photo, but the Pumpkin Pie pennant is the folded part of the card. The sentiment comes from the Word Play set.
Stampin Up Independent Demonstrator siblings Scot Strehlow and Kira Loy from Las Vegas share creative ideas for stamping, card making, scrapbooking, and paper crafting
Showing posts with label 1/8 inch taffeta ribbon. Show all posts
Thursday, August 9, 2012
Tuesday, August 9, 2011
Turtle & Co. Card Kit
Together, WE can make a difference! Through Stampin’ Up!’s Making a Difference program, time and money is donated to the Ronald McDonald House Charities (RMHC©), in part through the design and sale of an exclusive stamp set. With the help of demonstrators and customers, Stampin’ Up! has donated over $1,000,000 to RMHC to date! The stamp set this year is called Turtle & Co. (page 16), and $3 from the sale of each set is donated to the RMHC. We wanted to do our part to help out this great charity, so we are having our first ever Ronald McDonald stamp set card kit class! By attending the class, you will receive the stamp set (your choice of clear or wood mount) and make a card folder with 4 cards and envelopes (photos below). In turn, you’ll be donating $3 to RMHC! Here are the details for the class:
Date: Thursday, September 1st
Time: 6 p.m.
Place: Scot’s House
Cost: $20 for clear mount OR $25 for wood mount
RSVP by Wednesday, 8/24
We hope you'll join us! Or, if you can't attend the class, a $3 contribution is still made for each stamp set sold, so consider helping the RMHC through your purchase! Thank you!
Sunday, May 15, 2011
A Sense of Time Graduation Card
We have admired the Sense of Time stamp set ever since it premiered in one of the mini catalogs over a year ago, and we finally gave in and got it. It lends itself to inspirational graduation wishes. This is an easel card using the Bigz clear scallop square die for the big shot. The color spritzer tool was also used to spray random color over the clock on to the front of the card. The Happy Graduation sentiment is from our favorite Teeny Tiny Wishes set.
Friday, May 6, 2011
Strength & Hope to Benefit Breast Cancer Awareness
This card (another one from last Sunday's workshop) features the NEW Strength & Hope set. The awesome thing about this stamp set, is that Stampin' Up! is donating $2 from the sale of each one to the Breast Cancer Research Foundation (for more information, visit their website at http://www.bcrfcure.org/)! The set includes four images. There is also a digital kit that includes the 4-piece stamp brush set, 12 Designer Series Papers, and 10 embellishment pieces. You can purchase digital content on our Stampin' Up website at http://www.stampinsiblings.stampinup.net/
Thursday, March 24, 2011
Sale-a-Bration Ends Soon!
The Stampin' Up! annual Sale-a-Bration event will be ending soon on March 31st! Today's mini easel card, which was CASE'd from Bronwyn Eastley at addINKtivedesigns via Nancy Riley's blog, features one of the FREE stamps included in the huge Sale-a-Bration selection. The main butterfly image was decorated with the Fine Flourish stamp ($9.95 value, but FREE with your $50 order). The butterflies were all cut using Stampin' Up! exclusive Big Shot dies - Beautiful Butterflies Bigz die for the main and middle butterflies and the Beautiful Wings embosslit die for the front one. The "for you" sentiment is from the Fresh Cuts set. Basic pearl jewels and 1/8" Early Espresso taffeta ribbon complete the project.
Monday, March 21, 2011
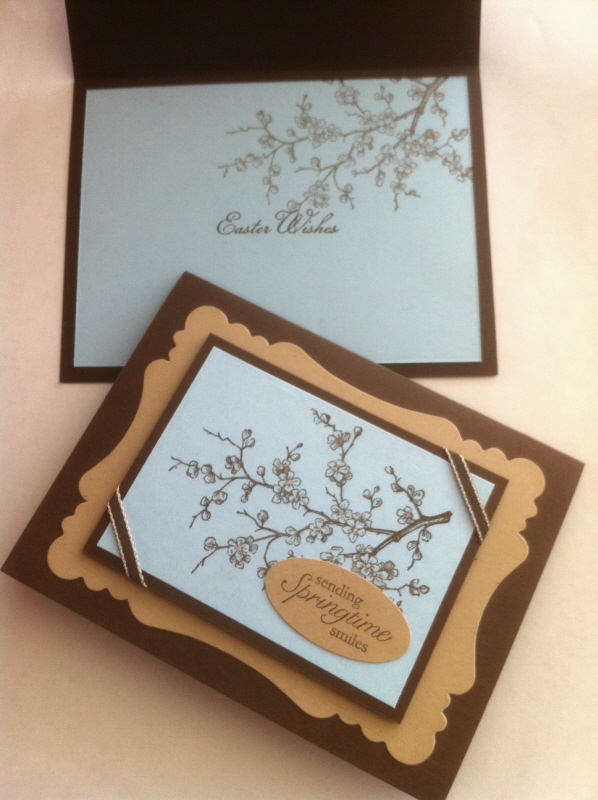
Sending Springtime Smiles
The image and outside sentiment featured on this card are from the Easter Blossoms set in the Occasions mini catalog. The Easter Wishes stamped inside comes from the Hostess level 2 set Something to Celebrate, also in the Occasions mini catalog. It doesn't show well in the photo, but the flower blossoms were highlighted with the white uni-ball Signo gel pen.
Sunday, February 20, 2011
Inspiration from an ULTA Advertisement
An ULTA flyer came in the mail earlier in the week and we loved the color combination of the make-up bag that was shown on the cover, so this was the card that the inspiration gave birth to...
The flowers and sentiment are from the hostess level 2 Apple Blossoms set.
Wednesday, January 26, 2011
Watercolor Beauty
The bright color combination of this card is sure to put anyone in a cheerful mood! The watercolor image is from the two-step hostess level 2 Fast & Fabulous set. For those of you who aren't familiar with "two-step", there are two separate stamps used to create the image, one is the outline and the other is the inside detail. The sentiment is from Fabulous Phrases and it's punched out using the curly label punch.
Monday, January 24, 2011
Butterfly Prints Birthday
This card features an image from the Butterfly Prints set and the sentiment is from Curly Cute. The butterflies were punched out using the butterfly punch and then tied with 1/8" taffeta ribbon to make the antennas (that doesn't seem like the right spelling, so excuse us if it isn't - HA!). The scallop trim border and 2 1/2" circle punches were also used. Although the DSP is from the retired Sweet Pea collection, any DSP can be substituted.
Sunday, January 23, 2011
Heartfelt Love
The I {Heart} Hearts set makes it perfect to express "heart"felt love! The specialty DSP is from the Love
Impressions collection in the Occasions mini catalog. The "heartfelt" stamp comes from the Fabulous Phrases set. Various punches were used for the heart images and sentiment.
Sunday, January 16, 2011
Valentine for a Friend
This card features the Elegant Bouquet embossing folder, the scallop edge border punch, and the Love You Much stamp set. The dotted scallop ribbon punch was used for cardstock that was placed around the edge of the stamped heart image.
Tuesday, January 4, 2011
Wish Big Cupcake Card
Like yesterday's post, this card was also made with the Big Shot, and will be one of the projects for January's Big Shot Club. The Bigz XL die cuts the cupcake card, the wavy bottom holder (complete with score lines), the cherry, and a candle (not pictured). We used the new red glimmer paper from the Stampin' Up Occasions mini catalog (which starts TODAY!) for the cherry. The glittered paper only comes in red at this time, but it is awesome because it doesn't come off (mess-free glitter...WOOHOO!), and it's sold in a package of two 12"x12" sheets. What a great way to add shimmer to your die-cut and punched images! We also added extra shimmer to the edge of the cupcake frosting with silver glass glitter, a treasure that originally appeared in the Holiday mini and has been carried over (with additional colors available) to the Occasions mini! The "Wish Big" sentiment is from the Word Play set and the inside sentiment is from the Full of Life set. The bottom holder and red inside cardstock layer were run through the paper crimper. We wrapped a piece of Real Red 1/8" taffeta ribbon around the bottom holder.
Saturday, January 1, 2011
Love Is In The Air
This is one of the cards we'll be doing for January's Big Shot Club. The front was done using the Lots of Love Letterpress plate in the Big Shot. Full disclosure: after trying the letterpress plates initially the way that Stampin' Up! recommends (using Craft ink and brayer for application), we vowed never to demonstrate them to our customers. Luckily, one of our fellow demonstrators shared with us how he had used one with a Versamark pad and the tackiness of the ink helped it adhere without slipping. So we tried it, and were pleased with the results (although we would still recommend using repositionable adhesive to stick the cardstock to the top cutting plate). Out of all the texture plates, this one is our favorite, as the design of the different fonts really creates a beautiful background, or the words can be cut or punched out and used alone. The colors are hard to decipher in the photo - we used Pretty In Pink for the card base and layered with Rich Razzleberry and Melon Mambo. The ribbon is 5/8" Rich Razzleberry satin with 1/8" Pretty In Pink taffeta on top.
Saturday, December 11, 2010
Ghiradelli Chocolate Holder
This idea came from Jill Hilliard, such an easy treat holder! This was also a great use for our leftover scraps of Candy Cane DSP (which is unfortunately sold out). As you can see, we tried a it a couple of different ways using each side of the paper, tilting the sentiment and spacing the ribbon holes differently. The measurement is so easy and you can get 3 of them out of an 8 1/2" x 11" sheet of cardstock, and save time by scoring the full sheet first. Cut the full sheet into 9" x 8", score along the 8" side at 3 7/8" and 4 1/8", then cut on the 9" side into three 3" pieces. The sentiment is from the Teeny Tiny Wishes set.
Tuesday, December 7, 2010
Peace on Earth Card
This card is very similar to one that we recently posted; however, we used the embossed frame for the stamped image. The "frame" was embossed using a thin wood oval frame and the Petals a Plenty embossing folder. The pine tree is from the Lovely as a Tree set. It was stamped in Wild Wasabi and then "thumped" with the Garden Green Stampin' Write marker. The tree trunk was colored prior to stamping using an Early Espresso Stampin' Write marker. We finished it off with a piece of 1/8" taffeta ribbon and a stamped sentiment from the Four the Holidays set inside.
Wednesday, December 1, 2010
Scallop Circle Gift Card Holder
This gift card holder starts with a 6" x 12" piece of cardstock, and is then folded and cut using the Bigz Scallop Circle die. After it's cut, it was embossed using a folder. The sentiment on the front is from the Grateful Greetings set and punched with the tag punch. They are an easy way to personalize a gift card!
Saturday, November 6, 2010
Poinsettia Card
This card was inspired by a couple of ideas from fellow demonstrators Lynn Pratt and Dawn Olchefske (we love their creative and clean designs). The poinsettia was stamped with Cherry Cobbler ink on a die-cut Cherry Cobbler circle using the leaf stamp from the French Foliage set. The circle (which was cut with the Big Shot using the Bigz clear circle die) is layered on a piece of Very Vanilla embossed with the Petals-a-Plenty folder, and then layered on an Always Artichoke card. The sentiment is from the Curly Cute set. The poinsettia is accented with the basic pearls and the card is finished off with a piece of 1/8" Early Espresso taffeta ribbon.
Sunday, October 31, 2010
Happy Halloween!
Two things that are hard to see in the photo (it was a last minute idea late last night) - the card base is Early Espresso and the Daffodil Delight panel is embossed with the paisley Sizzix texture plate. We couldn't let the holiday pass by for another year without a final Halloween wish for 2010. The pumpkin image is from the Paisley Prints stamp set in the Holiday mini catalog (another one of the included sets in our Convention registration fee). The happy halloween sentiment is from the Teeny Tiny Wishes set. The white piece was cut using the Top Note die for the Big Shot - cut once and then turned 90 degrees and run through again. The card is completed with a touch of Early Espresso 1/8" taffeta ribbon. We wish you a fun, safe, and Happy Halloween and hope your day is filled with wonderful treats!
Saturday, October 23, 2010
No Tricks, Just Treats!
These were done using some scraps of Wicked Fun Designer Series Paper. The pieces measured 4" x 3" to cover snack size Hershey bars. The paper was taped around them using Sticky Strip and then each end was crimped. They are finished off with an image from the Wicked Cool stamp set and some Basic Black 1/8" taffeta ribbon. One has a punched bat and the other has some basic rhinestones. Wouldn't all of the "goblins" in your life love to find these in their treat bags for Halloween? We would!
Wednesday, October 13, 2010
Herb Expressions
Here are some nice and simple coordinating cards using the Herb Expressions stamp set. The layer behind the image is embossed with the square lattice folder. The images are colored in using the blender pen, and the cards are finished off with some of the beautiful 1/8" taffeta ribbon. The colors are Marina Mist, Daffodil Delight, Rich Razzleberry, and Old Olive. Who says elegant cards have to be difficult?? Not us!! We are all about SIMPLE!!
Subscribe to:
Posts (Atom)
Snowflake Wishes Thank You Card
Everyone needs to say "thank you" during the holiday season. The Snowflake Wishes bundle makes it easy! The die-cut image creates ...
-
Everyone needs to say "thank you" during the holiday season. The Snowflake Wishes bundle makes it easy! The die-cut image creates ...
-
Every Tuesday evening, we meet for Happy Hour Stamping, where we each create our own version of a design, layout, etc. Last night we did a...
-
There are so many great designs for making your own gift card holders. This one is so easy to make and to produce multiples, especially for ...